Objective: Dive deeper into how to create and modify pages and tables in AL Language.
In this blog post, we will explore how to create and modify pages and tables in AL (Application Language) for Microsoft Dynamics 365 Business Central. Pages and tables are fundamental elements of any Business Central customization, as they define how data is stored and presented to users. This post will guide you through the process of designing these elements using practical examples from the Customer Rewards extension.
Creating Tables in AL Language
Tables in AL are used to store data. Each table object includes fields, keys, and triggers. Fields represent the columns in the table, keys define the primary and secondary keys for indexing, and triggers contain AL code that runs during specific database operations.
Here’s an example of a table used in the Customer Rewards extension:
table 50100 "Reward Level"
{
    fields
    {
        field(1; Level; Text[20]) { }

        field(2; "Minimum Reward Points"; Integer)
        {
            MinValue = 0;
            NotBlank = true;

            trigger OnValidate();
            var
                tempPoints: Integer;
                RewardLevel: Record "Reward Level";
            begin
                tempPoints := "Minimum Reward Points";
                RewardLevel.SetRange("Minimum Reward Points", tempPoints);
                if RewardLevel.FindFirst then
                    Error('Minimum Reward Points must be unique');
            end;
        }
    }

    keys
    {
        key(PK; Level)
        {
            Clustered = true;
        }
        key("Minimum Reward Points"; "Minimum Reward Points") { }
    }

    trigger OnInsert();
    begin
        Validate("Minimum Reward Points");
    end;

    trigger OnModify();
    begin
        Validate("Minimum Reward Points");
    end;
}
This table, 50100 Reward Level, stores information about reward levels. It has two fields: Level and Minimum Reward Points. The OnValidate trigger ensures that the minimum reward points are unique.
Modifying Existing Tables
Sometimes, you need to extend existing tables rather than creating new ones. This is done using table extensions. Here’s an example that adds a RewardPoints field to the existing Customer table:
tableextension 50100 "CustomerTable Ext." extends Customer
{
    fields
    {
        field(10001; RewardPoints; Integer)
        {
            MinValue = 0;
        }
    }
}
This extension ensures that customers can have reward points associated with them, adding new functionality to the existing Customer table.
Creating Pages in AL
Pages in AL are the user interface elements that allow users to interact with the data. Pages can be of various types, such as Card, List, and Worksheet.
Here is an example of a Card page for the Customer Rewards extension:
page 50100 "Customer Rewards Wizard"
{
    PageType = NavigatePage;
    Caption = 'Customer Rewards assisted setup guide';
    ContextSensitiveHelpPage = 'sales-rewards';

    layout
    {
        area(content)
        {
            group(MediaStandard)
            {
                Caption = '';
                Editable = false;
                Visible = TopBannerVisible;

                field("MediaResourcesStandard.""Media Reference"""; MediaResourcesStandard."Media Reference")
                {
                    ApplicationArea = All;
                    Editable = false;
                    ShowCaption = false;
                }
            }
            // Additional groups and fields follow
        }
    }

    actions
    {
        area(Processing)
        {
            action(ActionBack)
            {
                ApplicationArea = All;
                Caption = 'Back';
                Enabled = BackEnabled;
                Visible = BackEnabled;
                Image = PreviousRecord;
                InFooterBar = true;

                trigger OnAction();
                begin
                    NextStep(true);
                end;
            }
            // Additional actions follow
        }
    }

    trigger OnInit();
    begin
        LoadTopBanners;
    end;

    trigger OnOpenPage();
    begin
        Step := Step::First;
        EnableControls;
    end;

    local procedure EnableControls()
    begin
        ResetControls;

        case Step of
        Step::First :
          ShowFirstPage;
        // Additional cases follow
        end;
    end;
    // Additional local procedures follow

    var
        MediaRepositoryStandard: Record 9400;
        MediaResourcesStandard: Record 2000000182;
        Step: Option First, Second, Finish;
        ActivationCode: Text;
        TopBannerVisible: Boolean;
        FirstPageVisible: Boolean;
        SecondPageVisible: Boolean;
        FinalPageVisible: Boolean;
        FinishEnabled: Boolean;
        BackEnabled: Boolean;
        NextEnabled: Boolean;
        ActivateEnabled: Boolean;
        EnableCustomerRewards: Boolean;
}
This page, 50100 Customer Rewards Wizard, is a NavigatePage that guides users through the setup process for Customer Rewards. It includes several steps, each with its own set of fields and actions.
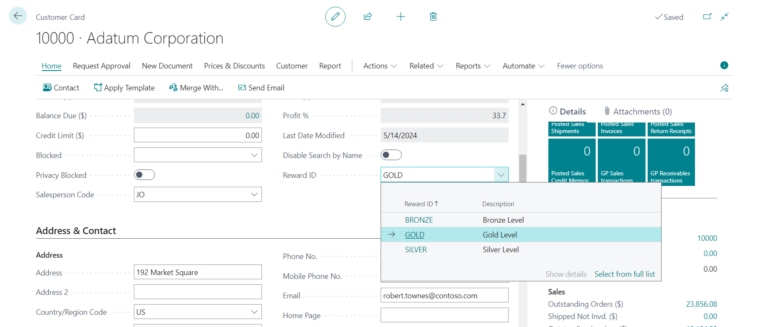
Modifying Existing Pages
You can also extend existing pages to add new functionality. Here’s an example of a page extension that adds new fields to the Customer Card page:
pageextension 50100 "Customer Card Ext." extends "Customer Card"
{
    layout
    {
        addafter(Name)
        {
            field(RewardLevel; RewardLevel)
            {
                ApplicationArea = All;
                Caption = 'Reward Level';
                Description = 'Reward level of the customer.';
                ToolTip = 'Specifies the level of reward that the customer has at this point.';
                Editable = false;
            }

            field(RewardPoints; RewardPoints)
            {
                ApplicationArea = All;
                Caption = 'Reward Points';
                Description = 'Reward points accrued by customer';
                ToolTip = 'Specifies the total number of points that the customer has at this point.';
                Editable = false;
            }
        }
    }

    trigger OnAfterGetRecord();
    var
        CustomerRewardsMgtExt: Codeunit "Customer Rewards Ext. Mgt.";
    begin
        RewardLevel := CustomerRewardsMgtExt.GetRewardLevel(RewardPoints);
    end;

    var
        RewardLevel: Text;
}
This extension adds the RewardLevel and RewardPoints fields to the Customer Card page, allowing users to see and interact with this new data.
Conclusion
Creating and modifying pages and tables in AL is crucial for developing robust extensions in Microsoft Dynamics 365 Business Central. By understanding how to design these elements, you can enhance the functionality and user experience of your extensions. This post covered the basics of designing pages and tables using practical examples from the Customer Rewards extension. In the next post, we will explore how to implement business logic in AL using triggers and procedures.
Check out the other articles in this series: