** Prerequisites
Windows 10 or 11 (Pro or Enterprise Edition)
Setting up your AL development environment is essential when you’re planning to create applications for Microsoft Dynamics 365 Business Central. Properly preparing your workspace before jumping into coding will make the process smoother and more efficient. This article will guide you through the initial steps needed to configure your AL development workspace, starting from installing Visual Studio Code to running your first AL project.
We will use Visual Studio Code (VS Code) as the preferred editor. To get started, download and install VS Code by visiting the official Visual Studio Code website and selecting the installer appropriate for your operating system. The site provides straightforward instructions; generally, you will download the installer and follow the on-screen directions. Once installed, take a moment to explore the interface and the various features of VS Code.
After installing VS Code, the next step is to add the AL Language extension, which is necessary for developing applications for Business Central. To install this extension, open the Extensions view by clicking the extensions icon on the sidebar or by using the shortcut Ctrl+Shift+X. Search for “AL Language” to find the extension published by Microsoft and click ‘Install’. This extension enables AL syntax highlighting, provides code snippets, and introduces other helpful tools to your development environment.
Following the setup of VS Code and the AL Language extension, you need to install Docker, which is used to create a containerized environment for running Business Central. This setup allows you to emulate a live application environment without needing multiple installations. Download Docker Desktop from Docker’s official website and follow the installation instructions provided. Pro or Enterprise version of Windows 10/11 is required to run the BC Image, which is a windows based image. Once Docker is operational, BcContainerHelper is used to create a BC container. BcContainerHelper is a collection of PowerShell scripts and cmdlets that are created by Microsoft to help you, as a developer, create and manage containers for BC. Run PowerShell as administrator and run the following commands to initiate the BC Container Wizard.
Install-Module bccontainerhelper -Force
New-BcContainerWizard
Complete the steps by selecting the defaults. No Business Central licenses will be required if defaults are selected. This wizard creates a PowerShell script that automates the process of creating the BC Server. Run this script. This script creates the BC Docker container. This can take some time if you are running it for the first time.
Now that your Docker container is up and running, the next task is to create your first AL project in VS Code. Press Ctrl+Shift+P to open the Command Palette and type ‘AL: Go!’. Select it, and then choose a directory for your project. VS Code will set up a basic AL project structure with sample files, including a simple “Hello World” application for BC.
After setting up your project, you will need to configure the launch.json file to define how your project connects and deploys to Business Central. Here’s how to set up this file:
- Generate the Launch Configuration: Open the Run view by clicking the play icon on the sidebar or pressing
Ctrl+Shift+D. Click on “create a launch.json file,” then select “AL: Launch with authentication” from the dropdown. - Edit the Configuration: Customize your
launch.jsonwith the necessary parameters for connecting to your Docker-hosted BC instance. A typical configuration might look like this:
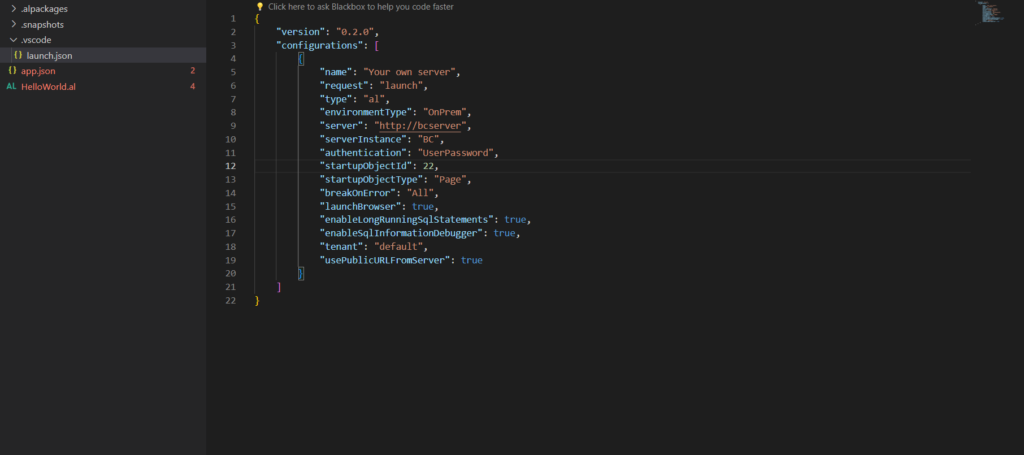
Your AL project includes several files, such as the app.json file, which contains important metadata like the project’s ID, name, and publisher. Another file, HelloWorld.al, demonstrates a basic page extension.
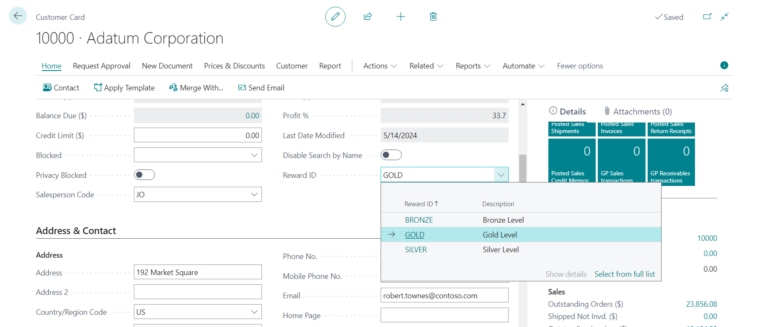
Once the launch.json file is configured, use the shortcut F5 or run the command ‘AL: Publish’ from the Command Palette. This process compiles your code, packages it into an extension, and deploys it to the BC instance running in your Docker container. After deploying, open a web browser, go to the AL development web client, and you should see your new extension. Right now the extension does not contain any customizations.
This setup will help you develop and test custom extensions for Business Central locally.
Check out the other articles in this series: